Tuesday, 9 April 2013

Cloudy days make work for idle hands....

At the kind request of a regular reader (thanks Maurice!) I've decided to show off the lovely Skywatcher 300P that I'm 'looking after' at the moment. It really is a lovely beast, so I should share it's glory with you all, rather than just touting my own work and letting its awesome size slip by unnoticed. Here he is, El Diablo:

Skywatcher 300P on Synta NEQ6 Pro (right) and TS Optics 6" on Synta EQ5 (left)

Comparison for size: That swarthy looking fellow is roughly 5'11". The 300P is 1.5 metres long!
I've also included a brief video of the 'scope slewing. It demonstrates nicely how quick the GOTO system can move a setup like this, and hopefully illustrates why such a system is useful, particularly when setup time with this beast takes so long!
The program in use is 'Cartes-du-ciel', an excellent free program which is simple to use and comparatively easy to synchronize if you wish to use it to control your telescope. It will also require the use of the ASCOM platform (ver 6) and EQMOD, another free patch which enables Cartes-du-ciel to communicate with the mount. You will also either need a Synscan (ver 3 or later) handset and a USB-serial adapter, or a USB mount interface, such as the Hitec Astro EqDir. Sorry for the rubbish production values in the video. I think it's clear I should remain an astronomer, never an entertainer!


Friday, 5 April 2013

Oh you just keep getting better!

Well, well. Once again we've been out with the Mega-beast. However, the AstroGods (sic) have been at it again, so seeing as we had such an awfully good session the previous night, we therefore paid with a lot of fiddling and funny results this time around.

However, all was certainly not lost.

Things started with difficulty - focus is remaining as an issue (really must make a Bhatinov mask!) and upon inspection of diffraction rings whilst out of focus, it appears we have a collimation issue to boot.

Regardless of these however, we plunged on, the trusty NEQ6 beeping and whirring as it sped its way around the cosmos above. Even after a couple of nights of use, what really strikes me about this piece of kit is its fluidity of movement, its graceful execution of this mind-bogglingly complex task. Whilst it may seem simple for a human to point a telescope at a particular part of sky, one must remember that this mechanised observer has no eyes and yet predicts the position of over 50,000 celestial objects using only a simple clock and a couple of motors. Impressive stuff.

Our first target then, at the request of my cousin: M104, the Sombrero galaxy, a real looker, at least when Hubble's taking the pictures. At a distance of around 30 million light years, this is no next door neighbour, and not a simple target, even for the Gigantoscope we've been using. Undeterred, we aligned the scope (turns out that if the result of the alignment "may be poor" it's pretty damned good. If it's "successful", it may be poor) and set off for the reaches of the Sombrero, and the faint fuzzy dropped neatly into view. After a frustrating focusing furore we were ready for the pictures, and here's what we got:

50 frames of 45 seconds each, unguided at ISO 800 and 20 dark frames. We attempted flats but they failed, so maybe next time.

M104: The Sombrero Galaxy in Virgo

Not an amazing shot, but the best we can do without guiding. Still though, you can see the huge dust belt that circles this lovely galaxy and the bright core within which lies a gargantuan black hole similar to that in our own galaxy. I really look forward to returning to this target when guiding becomes available.

Now, onto the winner of the evening. If you've read yesterday's post, you'll be familiar with my glowing appraisal of M13 the Hercules Cluster. Well, now you can see for yourself why I adore this cosmic jewel-haul quite so much. Once again, bad focus and collimation, but still it's a beautiful cluster.

21 frames of 45 sec at ISO 800, once again with 20 darks:

M13: The Hercules Cluster

Around 300,000 stars litter this glorious cosmic landscape, with the stars like twinkling dust on the velvet of night. I think it's plain to see why I set so much score by this cluster, and I'm delighted that I can finally show you something which I'm reasonably content with!

Thursday, 4 April 2013

Where to start?!!!!

Yesterday was quite a day. I'll attempt to start at the beginning, which is actually the night before!
It began on Tuesday night, when myself and AstroCousin tried to get my rig auto-guiding. Now I've been working on this for ages; getting the mount sturdy and well balanced, calibrating and locking into position the finder-guidescope, working out how to get the communication between the guidance software (PHD) and the mount's handset. Well all of this had worked individually over the preceding weeks and I thought it was time to get it all going for real. So we set up, found a target, went to guide and....nothing. Camera refuses to send commands to the mount. Right, well we stripped everything down, checked all the wiring, checked the soldering from the earlier modifications. Everything checked out fine but the camera just wasn't sending the signals, even though the PC was receiving an image. So it seems like the part of the camera that's connected to the mount is kaput.

Well that all put me in a pretty bad mood, as I've been fiddling with all this for months now. But then, something incredible happened! A friend called to say that he needed somewhere to store his telescope, and I grudgingly (ha!) agreed, on the proviso that I could use his wee-beastie. Well ladies and gentlemen let me tell you when I saw this colossus I was filled with lust, oh yes.
It's a 12" 1500mm focal length (f/4.9) monster on an NEQ6 Synscan mount. Fully GOTO and with more light gathering power than a herd of Hubbles, it looks like some kind of nuclear warhead launcher, and that's before you even turn it on.

Switching on was the hard part. After manhandling the enormous beast into it's brackets and tightening all the nuts, it was time to align with Polaris and fire the cannon up. Nothing doing. Did we need two power sources; one for the mount and one for the Synscan handset? No, that didn't help. Did we need a higher current supply? Nope. Turns out that although they put two power sockets on, you only use the one, which powers both units.

OK so we had juice. Next, the 3-Star alignment. Well...'mixed bag' is about the best description I can give our experiences of this process. However, once we'd correctly aligned the scope, found suitable guide-stars and tweaked our method, we finally had something we could work with.

When the NEQ6 slews with the giant telescope aboard, it really is as if we're targeting North Korea with a huge missile. The lumbering beast swivels neatly into place with unearthly and high-tech sounding beeps and whirs, demonstrating the presence of precision gears and controllers at work. Each time it effortlessly picks out our target and beeps satisfyingly, as if locked on and ready to fire. One half expects that beep to be succeeded by the rat-tat-tat of heavy gunfire or the roar-whoosh of an intercontinental ballistic missile launch.

Instead though, one looks into the eyepiece, and what riches one finds there! First, we visited an old favourite of mine (and everyone else's methinks), M42, the Orion Nebula. I chose this as a) I knew what I was looking for and b) it's a hard target to miss. Well it was lovely. The trapezium leapt out with four clearly defined and well separated stars. There was nebulosity aplenty and the full field of view was filled with that wispy blue smokiness that M42 lovers are so familiar with.
Then came M51, the enchanting Whirlpool Galaxy. This was the first time I had ever seen structure in a galaxy through the eyepiece. The spiral arms were clearly visible, and though I'd expected the evening to remain purely observational, I knew at this moment that we'd be taking a photo of this later on. For now though, we continued with naught but our eyes (and £1600 worth of telescope!). Next to Saturn, which leapt from the eyepiece in glorious colour. At 150x magnification it stood out beautifully against the darkness, three small moons accompanying it. The gap between the rings and the planet was visible even in the weakest eyepiece, and became a gulf under higher power. Also evident was the shadow of the planet upon the rings where they curved away behind the globe. I've seen Saturn many times before, but this was really something special. We even managed to persuade a 'wow' out of my usually under-awed sister-in-law who was persuaded out to see the twinkling edifice, and even more surprising from my wife as well!

From there we ventured to M64, the only mediocre target. It was still lovely of course, standing boldly out against the night, but we'd recently been wooed by the majesty of the Whirlpool, and so we moved quickly on to M13, the Hercules cluster, and that really was a wonder. Clear individual stars peppered the eyepiece, a million jewels sparkling brightly in the dark. The 'propeller' was visible too, a faint three-pointed dimness against the brightness of the cluster. More and more we magnified the cloud of twinkles, and more and more detailed it became, unlike anything else I've ever seen through a telescope. It was one of my favourite targets before, but now even more so.

Finally, it was time for a picture. In went the camera and we fiddled to get a rough focus. A quick 15 second exposure showed the cores of the two galaxies, and 30 seconds revealed detail in the spiral arms. In the end we settled for 75 exposures (25 were thrown out leaving 50) of 45 seconds each at ISO 800, with 25 darks. Unfortunately the focus was a bit soft, so we'll need another shot at this, but the result is still awesome, and here it is, taken with a Canon EOS 450D:


So all in all, an awesome evening. I think we were both suitably mind-blown, and will clearly be spending a good few more nights out with this monster of a telescope! More pictures will inevitably follow!

Monday, 1 April 2013

Back to one of my very first targets last night - the beautiful Hercules Cluster, M13.

Several differences from the original attempt: first it was with a longer focal length scope and so a larger image. Secondly, there were a few more exposures, although still not nearly enough to make me happy. Only about 15 passed muster upon inspection, and I'd like at least four times that many.

However, the detail is definitely better. One thing that really rankles though - eggy stars again! Really need to get on with this autoguiding malarkey (where a smaller scope guides the main imaging scope in order to allow longer exposures and prevent star trailing - eggs to you and me!) as I'm getting bored of saying the images are 'OK' or 'alright'. Would really like to get it down so that I can start posting something really good!
 Anyway -  M13 - strike two:
M13: The Great Globular Cluster in Hercules

M13: The Great Globular Cluster in Hercules
Comprised of around 300,000 stars, M13 (a.k.a. NGC 6205) lies over 20,000 light years away and orbits the Milky Way as a tiny companion; a collection of stars too small to be a galaxy, but yet still very large and extremely old. Many such clusters orbit our galaxy and as such have been instrumental in increasing our understanding of stellar and galactic evolution. This image, composed with the invaluable help of my cousin Jamie, was comprised of 15 of the best frames from 30 of 60 seconds each at ISO 800. The frames were stacked and the curves, luminance and saturation tweaked in Deep Sky Stacker.

Also in the same night we had a stab at a serendipitous find, the Sunflower Galaxy, M63, although we could definitely have done with longer exposures and more of them. Nevertheless, we have something, and it's an easy enough target so we'll definitely be going back to it, hopefully over the next few days, if the BBC Weather website is to be believed!


Whilst there's not a lot to see here, a little detail can just be made out. One problem with both of last night's images is that they were unwittingly shot in JPEG format rather than RAW, which means that DSS cannot correctly calibrate the images before stacking. What effect this ultimately has I'm unsure, but I'm certain RAW files would have produced a nicer result. Must remember to change back after doing terrestrial photography!
Anyway, this last image was comprised of 30 frames, each of 60 seconds at ISO 800. Once again stacked and tweaked in DSS, but this time it was taken with a Canon EOS 450D which I have kindly been lent in order to evaluate the camera as a potential upgrade. I must say that being able to connect to the laptop and focus using APT, as well as being able to specify a capturing scheme in this excellent program, has essentially convinced me that moving up to either the 450D or the 1100D is an essential move.

Tuesday, 26 March 2013

Comet and a full moon!

Finally spotted the elusive Comet - C/2011 L4 PANSTARRS! Been looking for quite a while now so I was really pleased to have caught it on the hop as it begins to make its journey out of our region of space and out into the depths of the solar system. A ball of rock and ice that hurtles around the sun at many thousands of miles per hour, the comet gains speed and also gains a tail as it approaches our star. The heating by the sun causes the surface of the 'dirty snowball' to vaporise. It is this tail that represents most of what we can see from earth, around the much smaller nucleus.

I've recently been given a 200mm lens for my DSLR. It's not the correct fitting though, which means an adapter prevents the use of autofocus, so everyhing here is hastily done by hand - the cheapo astronomer's way!

The clouds were scudding in and out and I was convinced I was going to miss it, but in the end I spotted a gap. I couldn't see the comet with the naked eye but decided to snap around in the general area. Well, for once luck was with me and the small nucleus and fan-like tail turned up on the first shot!

I took a few more and disappeared swiftly. I had enough for a quick animation and a stacked still - now I'm ready to go back with the full setup (telescope and all) next time it's clear. At least now I know it's possible!

Comet C/2011 L4 PANSTARRS from Aberdovey on 26th March 2013. Approx 20 frames of 2 seconds at ISO 800
Besides the comet, I spent a little time whilst waiting for the sky to darken to collect a few images in order to animate the rising of the moon. Not a particularly skillful or well made effort, but I like it all the same. I varied the settings for many of the images used, so I won't bore with the details, but suffice it to say that as the animation goes on, the exposures get shorter. Enjoy!
Both of the animations were made with Windows Live Movie Maker, and the still image was stacked in Deep Sky Stacker.

Friday, 15 March 2013

EQ5 Dual Axis Handset ST-4 Autoguider Guideport Modification

For the second time this year, I have found myself modifying the motor drive handset from my mount, so this time I thought I'd share the process in the hope that it might help someone in their own endeavours. Also, it shows someone thinking of the project just how simple it really is!

You will need:

  • A small Phillips (cross-head) screwdriver - preferably a few millimeters will do.
  • A soldering iron,
  • Solder,
  • Either the 'ST-4 Conversion Kit' which can be purchased from Opticstar (in the U.K.) or Shoestring Astronomy (in the U.S.). Alternatively, you can by any 6 core wire with an RJ12 connector - more on that shortly.
  • An EQ4 / 5 Dual Axis motor control handset.
  • Either an ASCOM compatible guide camera with ST-4 port or any other suitable guidecam / webcam and a GPUSB* guideport interface, also available from the above suppliers.
  • Autoguiding software. I use PHD, which is free, but there are others available.
  • About an hour of spare time.
            *Please note: This is only necessary if your camera does not have an ST-4 port. In cases of       cameras with this socket, for example the QHY5, the camera itself acts as the interface between the guiding software and the handset.

First, I will introduce the components we will be using:
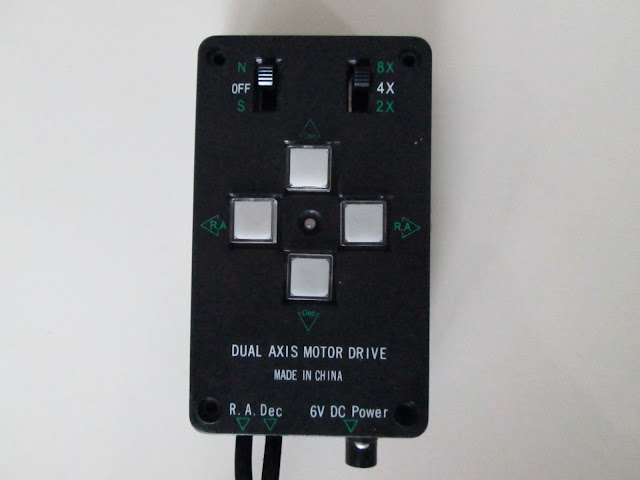
EQ4/5 Dual Axis Handset
 This is the dual axis handset that we use to track the sky as the earth rotates. This is fine for your first foray into astrophotography, but due to a number of factors it will not allow you to take exposures much longer than a minute.
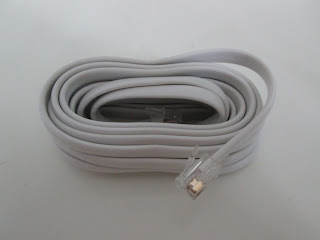
ST-4 Cable - RJ12 in non-astronomical circles.
This is the ST-4 cable. If you're ordering from one of the suppliers above, this will indeed be called an ST-4 cable. However, if you wish, as I did, to purchase one of these from any other supplier, it will go by a different name. It will then be known as an RJ12 6P6C cable, the 6 referring to the 6 wires running through it. Be careful not to confuse this with the RJ11 which has only 4wires, and some others have only 2.

These two images show the wiring layout of the cables used in this example. Be sure to check that your cables either use the same configuration (White - Brown - Red - Green - Yellow - Blue from left to right with the release clip of the connector facing towards you), or that you can familiarise yourself with the configuration of your cable in order to match the correct cables to the correct soldering joints. Incorrect wiring could lead to damage of your equipment.

Whilst we're on the subject I must point out that this modification is in no way recommended by myself or any of the suppliers of manufacturers involved - you undertake this at your own risk, and any warranties will be invalid.

Right, with the warnings done and tossed hastily to the side, provided you have all you need, it's time to begin!


STEP 1: Remove the buttons


Gently prise off the four buttons with a screwdriver. Use 2 screwdrivers if possible to avoid breaking the buttons. Lay the buttons to on side.

Step 2: Removing the top cover:

 Unscrew the four screws at each corner of the handset...
 And the two screws which attach the power socket to the main box.
 Then, the handset cover should come cleanly off and you should be left with the following:
Don't be afraid of what you see if you're unfamiliar with electronics - you can ignore 99% of everything that's in here. Just be careful not to touch anything you don't have to - particularly the chip on the lower board (which you'll see in a moment).

Step 3: Open up some access.

 Loosen and remove the two screws that fix the top board to the bottom board.


The top board now lifts away revealing the bottom board, which is the part that the hand controller uses to communicate with the mount. Note the large chip which I mentioned earlier. Be careful to have as little contact with this board as possible.


 There are three small screws holding the bottom board in place - remove these also.

Step 4: The Cable grip.

This is the cable grip - we will need to remove this in order to lay our new cable underneath it later on.It is most convenient to un-do this grip now, so as not to hamper yourself later on.
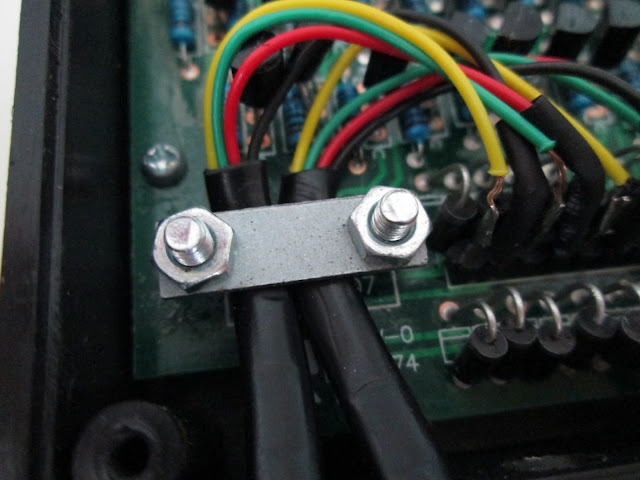
The cable grip. Note the small screw in the background - this should be removed, along with 2 others, as part of step 3.

Ensure that the power socket is dislodged from it.s nook, being careful of the delicate wires that connect it to the main board. These are fragile and can break if tugged on.

 Gently pull the main board away from its housing and turn over. You will see two bolts which hold the cable grip in place. Remove them.
 You should now be left with the following items:
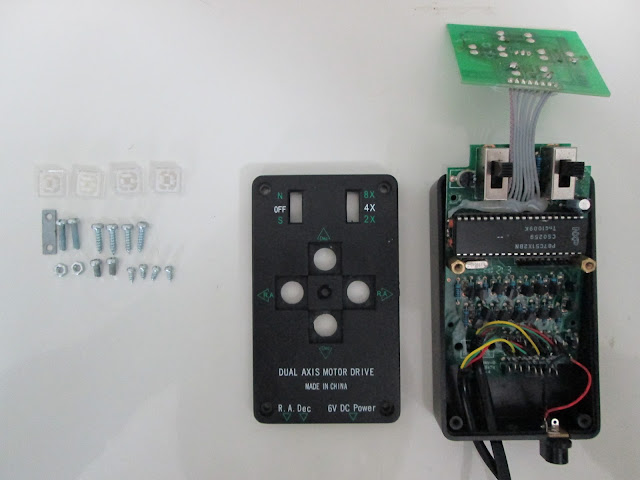
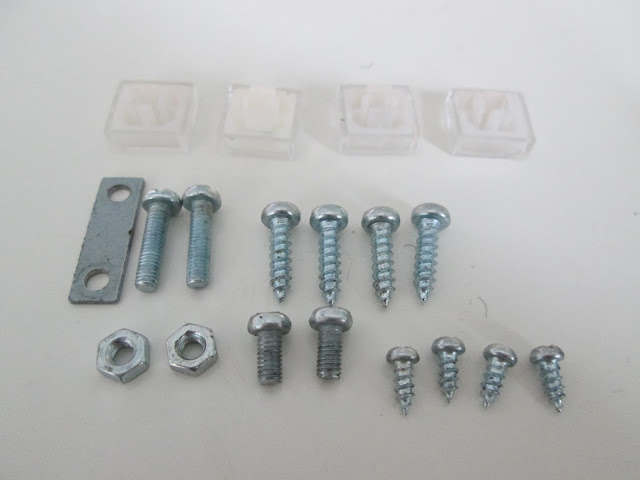
Note: You should have one more of the smallest screws than this - I have reattached the power socket for ease of photographing!

Again, there should be 5 of the smallest screws.
 Step 5: Hole boring

You can either chose to drill a hole:
 ...or cut a slot into the outer casing of the handset. The hole may be neater, but I found that a slot makes everything more flexible. Also, if you choose a hole MAKE SURE YOU PUSH YOUR NEW CABLE THROUGH THE HOLE BEFORE SOLDERING! Otherwise you'll find yourself having to redo the job after you do it! I only mention this because it's a mistake I have made myself! D'oh!
Step 6: Time to solder!

First, cut back the white (Pin 1) wire. This is unused by the handset. It is important not to have this hanging loose within the handset, as it may cause short circuiting or unpredictable behaviour.
Solder the wires into the follwing configurations. If you are a better solderer than me, which is very likely, your end result may look a tad tidier than this!
 Now that you have your wires soldered in place, it's importand to test the operation of the unit. Carefully plug the unit in. Be EXTREMELY careful not to touch any exposed wires or contacts at this point. There is a risk of electric shock. Carefully press each button, and ensure that this causes the green L.E.D. to turn red. If you have a stepper motor from your mount to hand, you can always plug this in to ensure that the buttons are doing what they're supposed to.  Personally, I check the functionality of the unit after every step from here on. It's easy to break off a solder joint or get a short circuit, so a quick check is a good idea.


Step 7: Put 'er back together!

First, put the three ST-4 cables beneath the cable grip and fasten it firmly. This is important as a loose grip will lead to broken solder joints in the future. A firm hold keeps everything together!
 Slot the main board back into place and attach with three of the small screws. Use one more of these to reattach the lower side of the power socket.
 Reattach the upper board with the two short, fat screws as follows:

 
And then replace the outer cover using the four long screws to hold it into place.
 Use the remaining small screw to firmly attach the power socket, clip-press the buttons back into place, and you've completed your ST-4 Guideport modification!

 The following describes the connections for the two options of using your guidescope and camera:

Using GPUSB Guideport Interface:

Camera<----(USB Cable)-----PC
                           PC----(Built in USB Cable)----->GPUSB-----(ST-4 Cable)----> Handset

Using ASCOM compatible camera with ST-4 port:

PC---(USB Cable)---->Camera----(ST-4 Cable)---->Handset

PLEASE NOTE: The EQ5 is not the ideal mount for astrophotography, and it will only enable a low payload capacity to be used. I would suggest considering the use  of a so-called 'finder-guider' rather than a dedicated guidescope, as these keep the weight to a minimum. If you do wish to use larger scopes with larger guiders, filter wheels and other equipment, you should consider upgrading to a sturdier mount. Of the more affordable mounts, consensus often favours the EQ6 and NEQ6 mounts, which have served many successful amatuer astrophotographers well.  The HEQ5 should really be seen as the minimum, and those taking on the EQ5 are either just slightly mad, or enjoy a challenge. Having said that, many people have made excellent use of this great mount. It remains to be seen if I manage to do so also!

Please also note that I accept no responsibility for any damage to your equipment during this process. I personally am notorious for breaking things and being a general bodge-artist (yes, that was the polite version), so my instructions should not be followed by anybody at any time!

Monday, 4 March 2013

Just a quick reprocess

Tried to bring out some more detail and improve the colours in M51 and NGC 5194. A bit nicer, but still a long way to go!

M51 and its companion NGC 5194


Galaxies are coming.....

Got a couple of new targets last night. They need work though, both on the scope end and in processing.
First:
M65 (Top), M66 (Bottom) and NGC 3628 (Left)
I took this whilst waiting for the next target to rise out of the trees. The three galaxies lie between 35 and 36 million light years away in the constellation of Leo, which earns them the name 'the Leo Triplet'. This image is made from 35 of the best from 60 frames of 45 seconds each, unguided through the TS Optics 6" f/4 Newtonian. Whilst it's not much of a picture, these galaxies do represent my most distant targets yet, so there's an element of excitement at having caught anything at all!

Then, last night's main target:
M51: The Whirlpool Galaxy
Strictly speaking this is actually a pair of galaxies, M51 on the right and NGC 5194 is the smaller disc on the left. In this rather beautiful gravitational interaction, M51 is stripping the stars away from it's smaller companion. Eventually, the larger will consume the little one, the two merging together to form a single larger galaxy. The system is of a similar size to our own galaxy, and indeed the Milky Way also faces a devastating collision one day, with our nearest large neighbour, the Andromeda Galaxy. However, this will not take place for 5-10 billion years yet! The image is comprised of 38 frames from a run of 60, at 45 seconds each. There have also been 57 dark frames subtracted from the image.

Saturday, 2 February 2013

Things I have learnt about Autoguiding so far...

1. Polar Alignment, Polar Alignment, Polar Alignment! Perfect PA is going to mean the difference between success and failure methinks.

2. Use a nice bright star as close to the image field of view as possible when calibrating in PHD. The program really doesn't like anything but a nice sparkly biggun for this.

3. Remove Moon Filter from guidecam before trying to guide. This really helps. Idiot.

4. Don't accept the default autoguider software settings offhand, they will definitely need a tweak!

5. Take darks with the guidecam, it makes things a whoooooole lot easier!

6. Do not kick the tripod. Then, repeat to one's self: "Do not kick the tripod".

7. Be prepared to spend a lot of time learning and practicing. Guiding certainly isn't happening over night!

8. Do not kick the #%$¥ing tripod!!!!

Monday, 28 January 2013

Much better Moon(s)!

Whilst testing out the guiding capabilities of my setup (inconclusive at this time),  I decided to test out both telescopes on our beautiful Moon. Last night (27th January 2013), she was full and really bright, so a filter was used to bring down the brightness. Without it, all the camera was picking up was a big white circle!

Anyway, the first shot:
Moon 27th Jan 2013 with QHY5v and TS Optics 150mm. Mosaic of 5 images of 263 frames each.
 This was taken with the larger of the two scopes. It has actually been built up from 5 images of different regions, which in turn have been taken from an .avi file of 263 frames per image. These 5 .avi files have been aligned, stacked and processed in Registax 6, an excellent piece of free software, and then exported to Photoshop where they are stitched together to make the final image.

And the second image:

Moon 27th Jan 2013 with QHY5v and William Optics 66mm. Mosaic of 2 images of 1863 frames each
This image is taken with the smaller WO66, but is a mosaic of 2 images made from 1863 frames each. The greater number of frames has clearly led to a sharper image, but unfortunately there is a blemish in the Procellarum Oceanus (top left). I have amateurishly tried to remove the blemish in the next image, but a reprocess will be in order to get rid of it more effectively:
Moon 27th Jan 2013 with QHY5v and William Optics 66mm. Mosaic of 2 images of 1863 frames each (Blemish Removed)

All in all I'm pretty pleased with what my kit has produced. It's not a lunar set up by any means but these pics are quite pretty! I just worry now that getting a taste of solar system imaging could lead to another purchase. A nice Catadioptric could be on the cards!

Friday, 18 January 2013

Building a website....

Started putting a website together over the last few days...

www.badgerastro.co.uk

...the idea being that it can be a 'one-stop-shop' for astronomy. So I'm putting up basic articles about telescopes, how to use them and what to / not to look for, introductory astronomy articles and links to good suppliers and further information. It's not completed yet, but if anyone fancies it, I'd appreciate some feedback. If you have a minute, please let me know what you think - all criticism welcome! E-mail for the website is admin@badgerastro.co.uk, or you can leave comments here!

Thanks in advance,

Badgerchap

Sunday, 13 January 2013

New pics! One new target and one old....

First useable astropics in some time! I took these last night and then processed them today:

M42 The Great Oriuon Nebula: Back to an old favourite.
 I took this at the end of my session yesterday, with 60 exposures of 30 seconds each on ISO 800. The scope was the TS 6" and the exposure was unguided, which frankly shows. Collimation is clearly still off (grr) as there is flaring on the brighter stars, but things are working, but guiding can't come soon enough! I certainly prefer the Running Man part of this compared to earlier attempts, but the colours in the main gas cloud seem over blue. I think if I can improve the stars with guiding and get a bit better with processing, I might start to get a decent image here.

NGC2024 (The Flame Nebula), IC 434 and Barnard 33 (The Horsehead Nebula)

This is the first time I've had a go at what is one of my favourite deep sky objects. The Flame is the large yellowish flash next to the largest star, Alnitak, which is the leftmost star of Orion's belt. IC434 is the pinkish streak and the Horsehead is, faily obviously, the small horsehead shaped diffuse nebula within IC434. When I was younger, I thought the horsehead was the whole complex, which still looks to me like it might be the head of a dragon.
The Horsehead itself is a vast cloud of dust which obscures the light emmanating from the emission nebula behind.

As for the image, I'm fairly pleased considering the equipment. My DSLR is unmoddified, which means that its built in Infrared filter is obscuring much of the light from IC434, a Hydrodgen Alpha region. Also, as with the image of M42, the collimation is inaccurate, leading to star flaring. Otherwise, it's not to bad. Guiding and better collimation will tidy things up a lot, even without a modification of my DSLR!

Saturday, 12 January 2013

Whilst my new kit is outside having a stab at the Horsehead Nebula, I thought it must be a good opportunity to plug a little documentary I made early last year. The sound's not terrific, but considering my microphone was a pair of iPhone headphones, what can I expect?! Comments kindly
requested. Thanks!
 
Incidentally, I do have the video sequence ready for a second episode, with somewhat better graphics, but haven't yet done the voiceover. If I get a positive response here, maybe I'll finally get around to finishing episode 2!

Friday, 11 January 2013

New Scope!

Once again, the clouds have remained resolutely in place, so what to do but mollify my needs by buying a nice new telescope!
 It is a TS Optics 6" (150mm) f/4 Newtonian, nice and fast for imaging. However, it came in the post, which means it's been plenty jossled in its travels!

I originally worried that there was something awry with the focusser, as it was very stiff and made a grinding noise. Turns out I hadn't taken into account that the focusser is presumably designed for imaging, and thusly to hold on to big heavy cameras. This means there are a number of tightening bolts on the mechanism which I'd neglected to loosen! Phew! No Problem.
Next problem isn't going to be so easy, and is going to take a lot of tweaking and, probably, swearing. There is a collimation issue, of course from the postal service! However, I'm less than expert at collimation, having only ever used a big Dobsonian. Whilst these need collimation, it doesn't need to be nearly as precise as with an imaging setup.


So, it's time to show you first light. Might seem to a reader as a step backward, as the focussing is terrible, but the image is only a single 1 minute sub, so there's clearly plenty of light arriving at the sensor.


Well, it's a starting point, another one, but there's still a mountain to climb. Once I have the collimation sorted on this puppy, then it's time to set out on the trying adventure that is autouiding! Wahey!

Wednesday, 28 November 2012

Cassini @ Home


Just something I've thrown together out of the continued boredom of this interminable cloud and ever brightening moon. After seeing the following image, which frankly blew my mind (if only I could et such resolution from here!), I looked for Cassini raw data, and found a haul of treats, some of which I threw together to make this video of Enceladus' jets.
Image Credit: NASA / JPL / Space Science Institute
 This photo of Saturn's North Polar Vortex was taken on November 27th 2012 by Cassini.